Epson Print Cd Software Download for Mac
How to Impress
Printing on CDs and DVDs
Find for CD/DVD printing

EPSON Print CD allows you to create CD and DVD labels. After you create the label, you can print it on 12-cm CDs and DVDs or viii-cm CDs and DVDs. Follow the steps below.
When printing on CDs and DVDs, continue the post-obit points in mind:
Notice for CD/DVD printing
- Utilise only CDs and DVDs labelled as suitable for printing, for example "Printable on the label surface" or "Printable with ink jet printers".
- For more than details on handling CDs and DVDs and guidelines for writing information to a CD or DVD, refer to your CD/DVD documentation.
- A lower level of color saturation is used to ensure impress quality when press on a CD or DVD, equally opposed to Epson special paper.
- Do non print on the CD or DVD earlier writing your data to it. If you exercise, fingerprints, dirt, or scratches on the surface may cause errors while writing data.
- Endeavour to exam printing on a spare CD or DVD.
- The printed surface is easily smeared immediately later printing.
- Be sure to let CDs and DVDs dry completely earlier using them or touching the printed surface.
- Do not let the printed CD or DVD dry in straight sunlight.
- Depending on the blazon of CD or DVD, smearing may occur depending on the level of colour saturation.
- If the printed surface is sticky even subsequently it has stale, the color saturation level may be besides loftier. In that case, lower the level of the colour saturation in EPSON Impress CD.
- Moisture on the printable surface may crusade smearing.
- If you are going to print a large amount of CDs or DVDs, starting time print on a few spare CDs or DVDs and bank check the printed surface after 24 hours.
- If the CD/DVD tray or the internal transparent compartment are accidentally printed on, immediately wipe off the ink.
- Reprinting on the same CD or DVD may not improve the impress quality.
- The printable area of CDs and DVDs is illustrated below.
| 12-cm CD/DVD | 8-cm CD/DVD |
 |  |
How to install, access, and uninstall EPSON Print CD
Follow the steps below to install, access, and uninstall EPSON Print CD.
Installing EPSON Impress CD
When installing the printer software, EPSON Print CD is also installed.
| | Notation: |
| |
|
| |
|
Accessing EPSON Print CD
| | Notation: |
| | To learn how to employ EPSON Print CD, select Help Topics from the Aid menu in the EPSON Print CD (for Windows) or EPSON Print CD Help from the Help menu (for Macintosh). |
For Windows
To access EPSON Print CD, double-click the EPSON Print CD icon on the desktop.
| | Note: |
| | If the EPSON Print CD icon does not announced on the desktop, click Get-go, point to Programs (Windows Me, 98, and 2000) or All Programs (Windows XP), indicate to EPSON Print CD, and and so click EPSON Print CD. |
For Mac OS X
To access EPSON Print CD, double-click the Macintosh Hard disk drive (default hard deejay) icon, double-click the Applications folder, then the EPSON Print CD folder, then the EPSON Print CD.
Uninstalling EPSON Impress CD
For Windows
 | For Windows Me, 98, and 2000, click the Outset button, bespeak to Settings, and so select Control Panel. For Windows XP, click the Start button, then select Control Panel. |
 | Double-click the Add together/Remove Programs icon and select EPSON Print CD from the list. Then click Add/Remove (Windows Me and 98) or Alter/Remove (Windows XP and 2000). |
 | Follow the on-screen instructions. |
For Mac Bone X
| | Insert the software CD into the CD-ROM drive. |
| | Double-click the English folder in the EPSON window, and and then double-click the EPSON Print CD folder. Next double-click the OS X Installer (E) icon. |
| | Click Accept. The installer dialog box appears. |
 | Select Uninstall from the pull-down carte at the top left, and and so click Uninstall. |
Positioning the CD/DVD
Follow the steps beneath to insert the CD/DVD into your printer.
| | Caution: |
| |
|
| | Note: |
| | Before press on a CD/DVD, it is necessary to clean the rollers inside of the printer by feeding and ejecting Letter size manifestly paper. |
| | Make sure that the printer is on. |
| | Open the printer cover and the CD/DVD guide. |
 |  |
| | Place a CD or DVD on the CD/DVD tray with the characterization surface facing up. |
| 12-cm CD/DVD | 8-cm CD/DVD |
 | 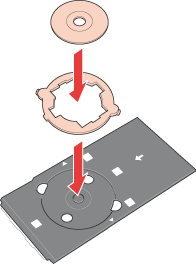 |
It is necessary to use the eight-cm adapter in conjunction with the CD/DVD tray when printing on 8-cm CD/DVD'south. There are three tabs protruding from the perimeter of the eight-cm adapter; 2 round tabs diagonally opposite each other, and one small-scale rectangular tab. The round tabs stand for to the semi-circular holes in the CD/DVD tray. Holding the 8-cm CD/DVD adapter and then that the semi-circular tabs fit into the semi round holes, insert the 8-cm adapter into the CD/DVD tray, as if it were a CD. The single rectangular tab should also fit neatly into the indentation at either the top or the bottom of the CD/DVD tray. To remove the adapter, gently push up on the round tabs.
| | With the CD/DVD loaded printable side up, gently insert the CD/DVD tray forth the base of the CD/DVD guide until the marks on the CD/DVD tray and the CD/DVD guide match each other. |

 | Shut the printer cover. |
Printing on a CD/DVD in Windows
EPSON Print CD lets you print images on CDs and DVDs. The following instructions explicate how to print on a CD or DVD using EPSON Print CD.
Selecting Basic settings
| | Select Print from the File menu. The Print window appears. |
| | Make sure that EPSON Stylus Photo R220 Series is selected every bit the printer. |
| | Select CD/DVD or CD/DVD Premium Surface equally the Media Type setting. |
| | Select None as the Impress Confirmation Pattern setting, and and then click Print. |

| | Note: |
| |
|
| |
|
| |
|
| |
|
| |
|
Selecting Advanced settings
You can select more complex settings using the printer driver.
| | Click Print on the File menu. The Print dialog box appears. |
| | Click the Transmission Print push. |
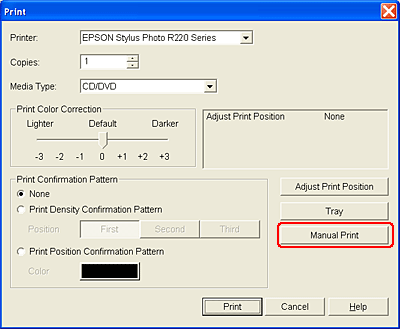
| | Brand certain that EPSON Stylus Photo R220 Series is selected. |
| | Select A4 as the newspaper Size setting. |
| | Select CD/DVD equally the Source setting. |
 | Select Portrait as the Orientation setting. |

 | Click Properties to access the printer driver. |
 | Select CD/DVD or CD/DVD Premium Surface as the paper Type setting. |
 | Select other settings as necessary. |
 | Click OK to shut the printer commuter window. |

 | Click OK to print your CD or DVD. |
Printing on a CD/DVD in Mac Os X
Selecting Bones settings
| | Select Print from the File carte. The Print window appears. |
| | Click the Select Printer push button. |
| | Select Stylus Photo R220 from the printer list. |
| | Select CD/DVD or CD/DVD Premium Surface every bit the Media Blazon. |
| | Brand certain None is selected as Test Print Blueprint setting, and so click Print. |

| | Notation: |
| |
|
| |
|
| |
|
| |
|
| |
|
Selecting Advanced settings
You can select more complex settings using the printer driver.
| | Select Print on the File menu. The Print dialog box appears. |
| | Click the Manual Impress button to access the Page Setup window. |

| | The following window appears, click OK. |

| | Select Stylus Photograph R220 in the Format pop-up carte. |
| | Select A4 as the Paper Size setting. |
| | Select Portrait as the Orientation setting. |
| | Click OK to access the Print window. |

| | Select Stylus Photo R220 in the Printer pop-up menu. |
| | Select Print Settings from the pop-upward menu. |
| | Select CD/DVD or CD/DVD Premium Surface every bit the Media Type setting. |
| | Select other settings as necessary, then click Print. |

Version 1.00E, Copyright © 2003, SEIKO EPSON CORPORATION
Epson Print Cd Software Download for Mac
Posted by: felixcracenduch1992.blogspot.com


0 Komentar
Post a Comment